
Most of the tutorials and guidelines focus on using a storyboard or an .xib file for each view controller or UIView object and that includes interacting with UITableView and UICollectionView. In this walkthrough, I decided not to use a storyboard to implemented a horizontally scrollable collection of cells inside a UITableView but instead define the required variables and delegates and set the constraints programmatically.
Requirements
- iOS 13
- Swift 5
- Xcode 13.1
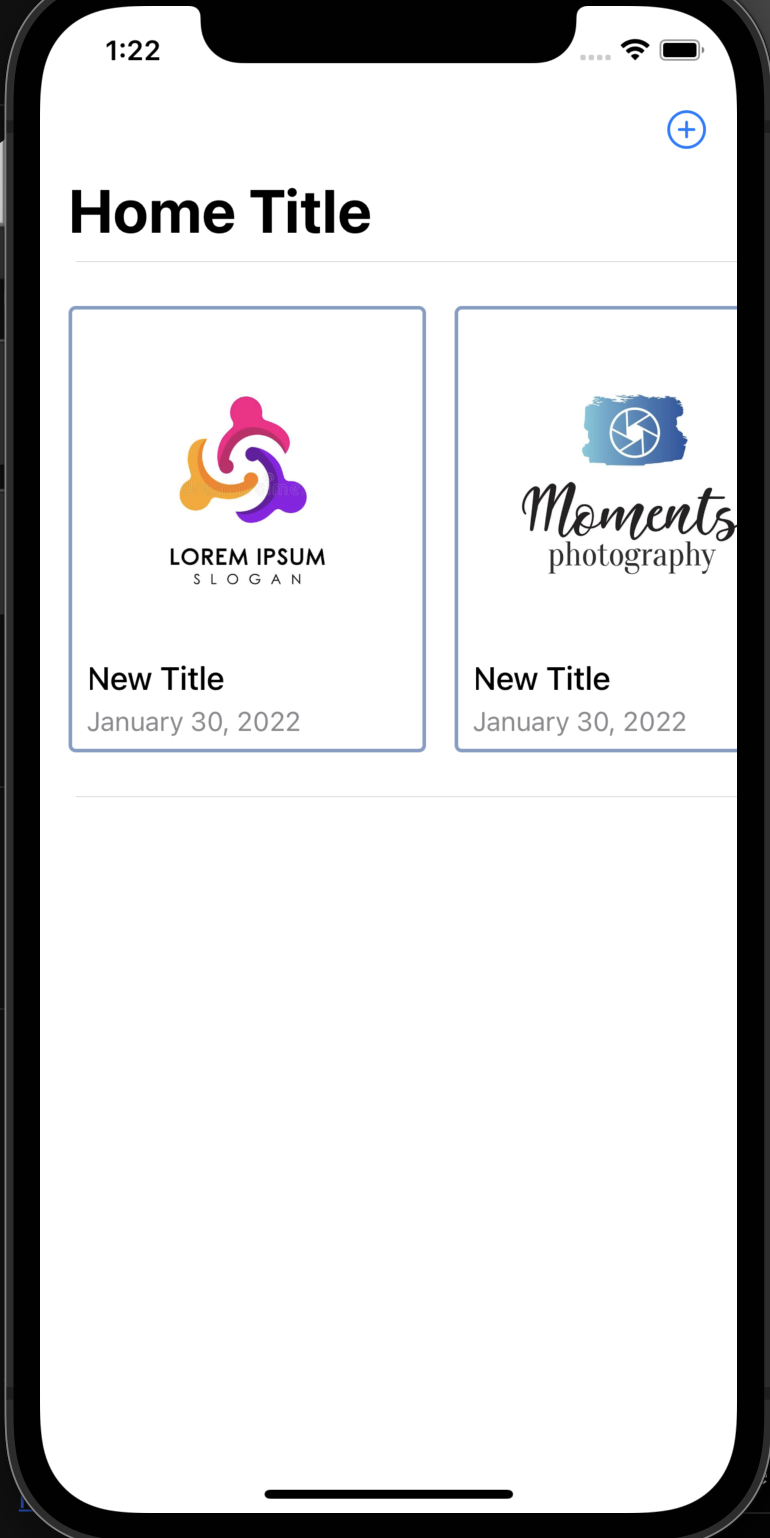
Final Result
Housekeeping
To begin with this demo, create a fresh iOS project and set the minimum deployment target as iOS 13 in both the project (Info tab) and the target (General tab).
- Project Info tab

- Target general settings

Also, we need — which is optional — two sets of swift file that store the data for the table cells and constants for the height and width of the table cells. For that to happen, create two swift files and name them Content and Configuration
- For
Content.swift
// Content.swift

struct Content {

    let id: UUID
    let title: String
    let date: Date
    let imageTitle: String

    init(title: String, date: Date = Date(), imageTitle: String) {
        self.id = UUID()
        self.title = title
        self.date = date
        self.imageTitle = imageTitle
    }

}
- For
Configuration.swift
//  Configuration.swift

import UIKit

enum TableLayoutConstant {
    static let spacing: CGFloat = 16.0
    static let itemHeight: CGFloat = 250
    static let itemWidth: CGFloat = 200.0
}

enum LayoutConstants {

		//MARK: Collection View Cell
    static let viewCornerRadius: CGFloat = 4.0

    static let imageHeight: CGFloat = 180.0

    static let topPadding: CGFloat = 10.0
    static let verticalSpacing: CGFloat = 8.0
    static let horizontalPadding: CGFloat = 10.0
    static let profileDescriptionVerticalPadding: CGFloat = 8.0

}
Replacing Storyboard
Since we are not going to implement storyboard or any .xib in this demo, we need to remove the main.storyboard and the default ViewController.swift that comes with a fresh iOS project. When these two files are removed, we will replace them with a new class that has a subclass of UITableViewController
To remove main.storyboard :
- Go to the project targets and remove Main from
Main Interfacedropdown menu

- Type
mainin the search box and from the result check theinfo.plist

- Remove Storyboard Name entry from
info.plist

It’s time now to add a new entry point for our demo. To do so, we are going to create a new Cocoa Touch class that will be named HomeTableViewController with a subclass of UITableViewController
- Choosing Cocoa Touch Class

- Naming the file and adding a subclass.

When the new file is created, head over to SceneDelegate to adjust and include our new HomeTableViewController.swift as the main entry point with UINavigationController.
//  SceneDelegate.swift

class SceneDelegate: UIResponder, UIWindowSceneDelegate {

    var window: UIWindow?

    func scene(_ scene: UIScene, willConnectTo session: UISceneSession, options connectionOptions: UIScene.ConnectionOptions) {
        guard let windowScene = (scene as? UIWindowScene) else { return }

        window = UIWindow(windowScene: windowScene)
        window?.rootViewController = UINavigationController(rootViewController: HomeTableViewController())
        window?.makeKeyAndVisible()

    }
}
Main Entry Point (HomeTableViewController) Setup
Head over to HomeTableViewController.swift to add a variable as an array to hold our data and run the app to test if the new entry point is working as expected.
- Add a new variable
contents - Set the view background color
- Set a navigation title for the view controller
//  HomeTableViewController.swift

import UIKit

class HomeTableViewController: UITableViewController {

    private lazy var contents = [Content]()

    override func viewDidLoad() {
        super.viewDidLoad()

		// Set background color for the main view
        view.backgroundColor = .systemBackground

        setupNavigation()
    }

    override func viewWillAppear(_ animated: Bool) {
        super.viewWillAppear(animated)
    }

    private func setupNavigation() {

		// Set title for the navigation bar
        title = "Home Title"

		// Set navigation bar title as a large title
        navigationItem.largeTitleDisplayMode = .automatic
        navigationController?.navigationBar.prefersLargeTitles = true

		// Include a button in the right corner of the navigation bar
        navigationItem.rightBarButtonItem = UIBarButtonItem(
          image: UIImage(systemName: "plus.circle"),
          style: .done,
          target: self,
          action: #selector(didTapNewItemButton)
        )
        navigationItem.rightBarButtonItem?.accessibilityLabel = "New Home Item"

    }

    @objc func didTapNewItemButton() {

    }

}
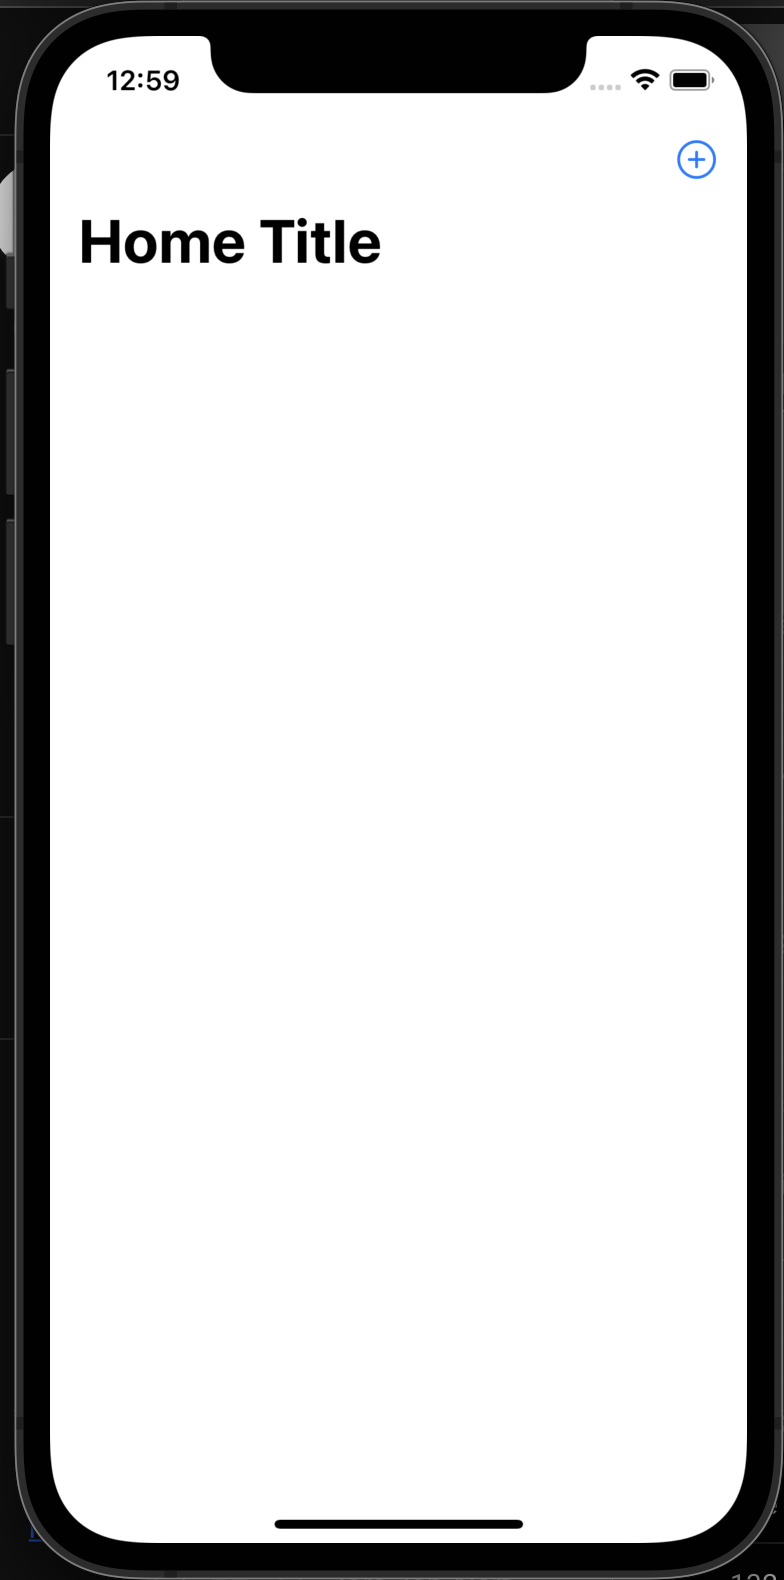
When you run the app, the output has to include a large title and a plus button at the right hand corner of the navigation bar (Testing against iPhone 12).
Application Flow
We are going to have three different swift files to produce the result below.

Here is a breakdown for all the three swift files:
HomeTableViewController(the entry point) which will define all necessary delegates forUITableViewand register a table view cell.HomeTableViewCellis where the collection view will be defined and all necessary delegates forUICollectionViewwill be created. The collection view in this file will register a collection view cell.HomeCollectionViewCellwill contain the layout for an individual card (see below) and how the data will be represented.

HomeTableViewController - Entry Point Setup
HomeTableViewController is the entry point of the app which will be used to setup all the required delegates for the UITableViewController and register a table view cell. Since the class is a subclass of UITableViewController , we do not need to inherit UITableViewDelegate and UITableViewDataSource.
Using extension to organize the code base, we are going to include all the required functions for the UITableViewDelegate and UITableViewDataSource
// HomeTableViewController.swift

//MARK: - UITable Delegates
extension HomeTableViewController {

	// How many rows that table will have
    override func tableView(_ tableView: UITableView, numberOfRowsInSection section: Int) -> Int {
        return 1
    }

    override func tableView(_ tableView: UITableView, cellForRowAt indexPath: IndexPath) -> UITableViewCell {
        return UITableViewCell()
    }

	// The height of each row
    override func tableView(_ tableView: UITableView, heightForRowAt indexPath: IndexPath) -> CGFloat {
        return 300
    }

}
Few points to go though:
- The number of rows will be fixed to one as we are going to use the first row to display a collection view.
- In
cellForRowAtfunction, initially we are going to return aUITableViewCelluntil we create a new subclass that inherits it. The function will be updated accordingly.
HomeTableViewCell - Cells for the Table View
We need to create a new class that inherits UITableViewCell and will be used to replace the values in override func tableView(_ tableView: UITableView, cellForRowAt indexPath: IndexPath)
To create the file, create a Cocoa Touch class with a subclass of UITableViewCell

In this new file, we will create the following variables:
- a cell identifier to be used later on
HomeTableViewController - a private lazy collection view variable that will be used to register
UICollectionViewCell - an
itemsvariable that will be holding the data that will populate the collectionview - an
initfunction
//  HomeTableViewCell.swift
class HomeTableViewCell: UITableViewCell {

    // cell identifier
    static let reuseIdentifier = String(describing: HomeTableViewCell.self)

    // Collection View
    private lazy var collectionView: UICollectionView = {

        let flowLayout = UICollectionViewFlowLayout()
        flowLayout.scrollDirection = .horizontal // Sets the scrolling direction for the collection view as horizontal

        let collection = UICollectionView(frame: .zero, collectionViewLayout: flowLayout)
        collection.translatesAutoresizingMaskIntoConstraints = false
        collection.isScrollEnabled = true
        collection.backgroundColor = .systemBackground

        return collection

    }()

    var items = [Content]()

    // Initialization for the class
    override init(style: UITableViewCell.CellStyle, reuseIdentifier: String?) {
        super.init(style: style, reuseIdentifier: reuseIdentifier)
    }

    required init?(coder: NSCoder) {
        fatalError("init(coder:) has not been implemented")
    }
}
Next, we need to include UICollectionView delegates as extensions
- UICollectionViewDataSource
- initially,
cellForItemAtwill returnUICollectionViewCell()until the class that inherits fromUICollectionViewCellis available. numberOfItemsInSectionwill have the count of items that will be displayed in each collection view cell.
- initially,
//MARK: - UICollectionViewDataSource
extension HomeTableViewCell: UICollectionViewDataSource {

    func collectionView(_ collectionView: UICollectionView, didSelectItemAt indexPath: IndexPath) {
        // process the selected item
    }

    func collectionView(_ collectionView: UICollectionView, numberOfItemsInSection section: Int) -> Int {
		// will be used to return how many items are in the collection cell
        return items.count
    }

    func collectionView(_ collectionView: UICollectionView, cellForItemAt indexPath: IndexPath) -> UICollectionViewCell {
        return UICollectionViewCell()
    }

}
- UICollectionViewDelegateFlowLayout
//MARK: - UICollectionViewDelegateFlowLayout
extension HomeTableViewCell: UICollectionViewDelegateFlowLayout {

    func collectionView(_ collectionView: UICollectionView, layout collectionViewLayout: UICollectionViewLayout, sizeForItemAt indexPath: IndexPath) -> CGSize {
        return CGSize(width: TableLayoutConstant.itemWidth, height: TableLayoutConstant.itemHeight)
    }

    func collectionView(_ collectionView: UICollectionView, layout collectionViewLayout: UICollectionViewLayout, insetForSectionAt section: Int) -> UIEdgeInsets {
        return UIEdgeInsets(
            top: TableLayoutConstant.spacing,
            left: TableLayoutConstant.spacing,
            bottom: TableLayoutConstant.spacing,
            right: TableLayoutConstant.spacing
        )
    }

    func collectionView(_ collectionView: UICollectionView, layout collectionViewLayout: UICollectionViewLayout, minimumLineSpacingForSectionAt section: Int) -> CGFloat {
        return TableLayoutConstant.spacing
    }

    func collectionView(_ collectionView: UICollectionView, layout collectionViewLayout: UICollectionViewLayout, minimumInteritemSpacingForSectionAt section: Int) -> CGFloat {
        return TableLayoutConstant.spacing
    }

}
Now we have a collection view variable that needs to be added as a subview to the main UIView of the table cell. In order to do that, we need to add an initialization function the HomeTableViewCell
//  HomeTableViewCell.swift

class HomeTableViewCell: UITableViewCell {

	...

	override init(style: UITableViewCell.CellStyle, reuseIdentifier: String?) {

        super.init(style: style, reuseIdentifier: reuseIdentifier)

        setupViews()
        setupTableCellLayout()
    }

    required init?(coder: NSCoder) {
        fatalError("init(coder:) has not been implemented")
    }

	private func setupViews() {
        selectionStyle = .none

		// Add collectionView as subview to the contentView (Main UIView)
        contentView.addSubview(collectionView)

        collectionView.register(
            HomeCollectionCellView.self,
            forCellWithReuseIdentifier: HomeCollectionCellView.reuseIdentifier
        )

        // Assign delegates and dataSource - which has been defined in the previous step
        collectionView.delegate = self
        collectionView.dataSource = self
    }

    private func setupTableCellLayout() {

        // Add the required constraints to the collectionView
        NSLayoutConstraint.activate([
            collectionView.topAnchor.constraint(equalTo: contentView.safeAreaLayoutGuide.topAnchor),
            collectionView.bottomAnchor.constraint(equalTo: contentView.safeAreaLayoutGuide.bottomAnchor),
            collectionView.leadingAnchor.constraint(equalTo: contentView.safeAreaLayoutGuide.leadingAnchor),
            collectionView.trailingAnchor.constraint(equalTo: contentView.safeAreaLayoutGuide.trailingAnchor),
        ])
    }

}
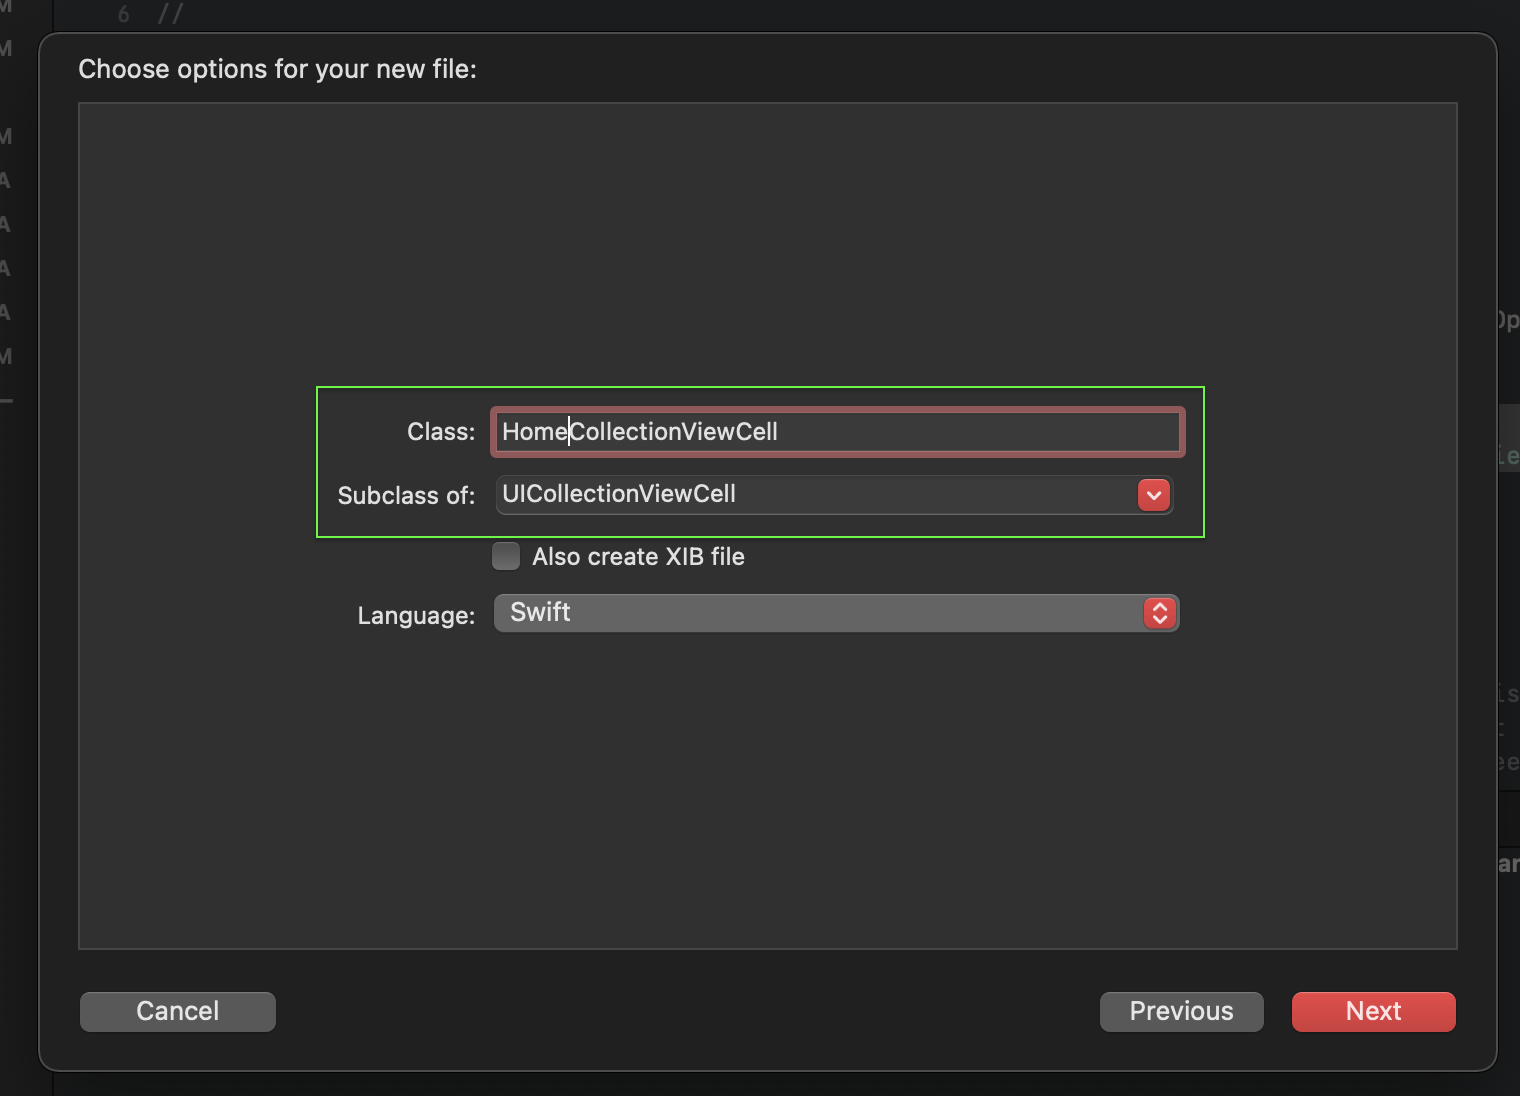
HomeCollectionViewCell - Cells for the Collection View
Let’s create a new file called HomeCollectionViewCell that is a subclass of UICollectionViewCell.
In the new class, we will define how the data will be represented. The data consists of a title, a subtitle (a date) and an image. To define these properties, the following lazy variables will be created:
- titleLabel
- subtitleLabel
- imageView
- dateFormatter
- a cell identifier which will be used to register this class as a cell for the collection view.
class HomeCollectionViewCell: UICollectionViewCell {


    private lazy var titleLabel: UILabel = {

        let label = UILabel()
        label.translatesAutoresizingMaskIntoConstraints = false
        label.textAlignment = .left
        label.numberOfLines = 0
        label.font = UIFont.systemFont(ofSize: 18, weight: .medium)
        label.textColor = .black
        label.layer.borderWidth = 2
        label.layer.borderColor = CGColor(red: 255.0, green: 240.0, blue: 123.0, alpha: 1)
        return label

    }()

    private lazy var subtitleLabel: UILabel = {

        let label = UILabel()
        label.translatesAutoresizingMaskIntoConstraints = false
        label.font = UIFont.preferredFont(forTextStyle: .subheadline)
        label.textColor = .secondaryLabel
        label.numberOfLines = 1
        label.adjustsFontForContentSizeCategory = true
        label.isAccessibilityElement = false
        return label

    }()

    private lazy var imageView: UIImageView = {

        let imageView = UIImageView(frame: .zero)
        imageView.contentMode = .scaleAspectFit
        imageView.translatesAutoresizingMaskIntoConstraints = false
        return imageView

    }()

    private lazy var dateFormatter: DateFormatter = {

        let dateFormatter = DateFormatter()
        dateFormatter.dateStyle = .long
        return dateFormatter

    }()


    static let reuseIdentifier = String(describing: HomeCollectionViewCell.self)

}
Next step, we need to include an initialiaztion function that will setup the views and constraints for this collection cell
class HomeCollectionViewCell: UICollectionViewCell {

    ...

    override init(frame: CGRect) {
        super.init(frame: .zero)

        setupViews()
        setupLayoutConstraint()
    }

    required init?(coder: NSCoder) {
        fatalError("init(coder:) has not been implemented")
    }

    private func setupViews() {
        contentView.clipsToBounds = true
        contentView.layer.cornerRadius = LayoutConstants.contentViewCornerRadius
        contentView.backgroundColor = .white

        contentView.layer.borderWidth = 2
        contentView.layer.borderColor = CGColor(red: 111/255, green: 138/255, blue: 183/255, alpha: 1)

        contentView.addSubview(imageView)
        contentView.addSubview(titleLabel)
        contentView.addSubview(subtitleLabel)
    }

    private func setupLayoutConstraint() {

        // Constraints for Image View
        NSLayoutConstraint.activate([
            imageView.trailingAnchor.constraint(equalTo: contentView.trailingAnchor),
            imageView.leadingAnchor.constraint(equalTo: contentView.leadingAnchor),
            imageView.topAnchor.constraint(equalTo: contentView.topAnchor, constant: LayoutConstants.topPadding),
            imageView.heightAnchor.constraint(equalToConstant: LayoutConstants.imageHeight)
        ])

        // Constraints for Title View
        NSLayoutConstraint.activate([
            titleLabel.trailingAnchor.constraint(equalTo: contentView.trailingAnchor),
            titleLabel.leadingAnchor.constraint(equalTo: contentView.leadingAnchor, constant: LayoutConstants.horizontalPadding),
            titleLabel.topAnchor.constraint(equalTo: imageView.bottomAnchor, constant: LayoutConstants.profileDescriptionVerticalPadding)
        ])

        // Constraints for Subtitle View
        NSLayoutConstraint.activate([
            subtitleLabel.trailingAnchor.constraint(equalTo: contentView.trailingAnchor),
            subtitleLabel.leadingAnchor.constraint(equalTo: contentView.leadingAnchor, constant: LayoutConstants.horizontalPadding),
            subtitleLabel.topAnchor.constraint(equalTo: titleLabel.bottomAnchor, constant: 4.0)
        ])
    }
}
Register the Cells (Table Cell and Collection Cell)
With all the required configurations out of the way (except for one), we can register the cells to their respective views i.e. Table Cell for Table View and Collection Cell for Collection View.
Let’s start with HomeTableViewController in viewDidLoad() function:
//  HomeTableViewController.swift

class HomeTableViewController: UITableViewController {

    ...

    override func viewDidLoad() {
        super.viewDidLoad()

        ...

        // Register the table cell
        tableView.register(HomeTableViewCell.self, forCellReuseIdentifier: HomeTableViewCell.reuseIdentifier)
    }

    ...

}
Next, it’s the time for HomeTableViewCell to register the collection cell under setupView() function.
//  HomeTableViewCell.swift

class HomeTableViewCell: UITableViewCell {

    ...

    private func setupView(){

        ...

        // Register the collection cell
        collectionView.register(HomeCollectionViewCell.self, forCellWithReuseIdentifier: HomeCollectionViewCell.reuseIdentifier)

        ...
    }

    ...

}
Before we pass the data to the table and collection views, we need to tell each cell (Table Cell and Collection Cell) which data to use. In order to do so:
- head to
HomeCollectionViewCelland add aconfigurefunction.
//  HomeCollectionViewCell.swift

class HomeCollectionViewCell: UICollectionViewCell {

    ...

    public func configure(with item: Content) {
        titleLabel.text = item.title

        let subtitleText = dateFormatter.string(from: item.date)
        subtitleLabel.text = subtitleText

        let desiredImage = UIImage(named: item.imageTitle)
        imageView.image = desiredImage

    }

}
- from there, go to
HomeTableViewCelland add anotherconfigurefunction.
//  HomeTableViewCell.swift

class HomeTableViewCell: UITableViewCell {

    ...

    public func configure(with items: [Content]) {
        self.items = items
                // Reload the collection view
        collectionView.reloadData()
    }

}
The last step is to pass the data from table view to table cell and from collection view to collection cell. Head to:
- the
UITableDelegatesextension underHomeTableViewControllerand change the return type forcellForRowAtfunction.
//  HomeTableViewController.swift

//MARK: - UITable Delegates
extension HomeTableViewController {

    ...

    override func tableView(_ tableView: UITableView, cellForRowAt indexPath: IndexPath) -> UITableViewCell {

        let cell = tableView.dequeueReusableCell(withIdentifier: HomeTableViewCell.reuseIdentifier, for: indexPath) as! HomeTableViewCell

        cell.configure(with: contents)

        return cell
    }

    ...

}
- the
UICollectionViewDataSourceextension underHomeTableViewCelland change the return type forcellForRowAtfunction.
//  HomeTableViewCell.swift

//MARK: - UICollectionViewDataSource
extension HomeTableViewCell: UICollectionViewDataSource {

    ...

    func collectionView(_ collectionView: UICollectionView, cellForItemAt indexPath: IndexPath) -> UICollectionViewCell {

        let cell = collectionView.dequeueReusableCell(withReuseIdentifier: HomeCollectionViewCell.reuseIdentifier, for: indexPath) as! HomeCollectionViewCell

        cell.configure(with: items[indexPath.row])

        return cell

    }

}
Random Data
With the completion of all the required configurations, it’s time to populate the table with some random data. Head to viewWillappear() function under the main class HomeTableViewController and append random data to contents array.
//  HomeTableViewController.swift

class HomeTableViewController: UITableViewController {

    override func viewWillAppear(_ animated: Bool) {
        super.viewWillAppear(animated)

        // Populate the contents array
        contents.append(Content(title: "New Title", imageTitle: "image02.jpeg"))
        contents.append(Content(title: "New Title", imageTitle: "image03.jpeg"))
    }

}
Build and run (⌘ + R) the app to see the final result.